Install GoodData.CN on AWS
The GoodData.CN Terraform repository provides Infrastructure as Code to deploy a complete GoodData.CN proof-of-concept environment on AWS. This automated deployment creates all the necessary AWS resources and configures a fully functional GoodData.CN instance in approximately 20 minutes.
This Terraform-based deployment handles everything for you:
- Creates AWS infrastructure (VPC, EKS, RDS, S3, networking)
- Deploys GoodData.CN with all required dependencies
- Configures TLS certificates and ingress
- Sets up monitoring and autoscaling
- Provides scripts for organization management
Prerequisites
Before starting, ensure you have:
- AWS account with appropriate permissions for creating VPC, EKS, RDS, and S3 resources
- Terraform installed
- AWS CLI installed and configured
- kubectl installed
- Helm installed
- Tinkey installed for encryption key generation
- Standard utilities:
curl,openssl, andbase64 - GoodData.CN license key (your GoodData contact can help you obtain this)
- Docker Hub account (free account sufficient) to avoid image pull rate limits
For example, here’s how to configure prerequisites on a fresh Debian/Ubuntu Linux installation:
# Install Homebrew if not already installed
/bin/bash -c "$(curl -fsSL https://raw.githubusercontent.com/Homebrew/install/HEAD/install.sh)"

# Install required tools
brew install terraform awscli kubectl helm

# Install Tinkey for encryption keys
brew install tink
Dev Container
If you prefer not to install all CLI tools locally, the repository includes a .devcontainer configuration. After installing the Dev Containers extension in VS Code, reopen the repository in a container to use the pre-installed toolchain.
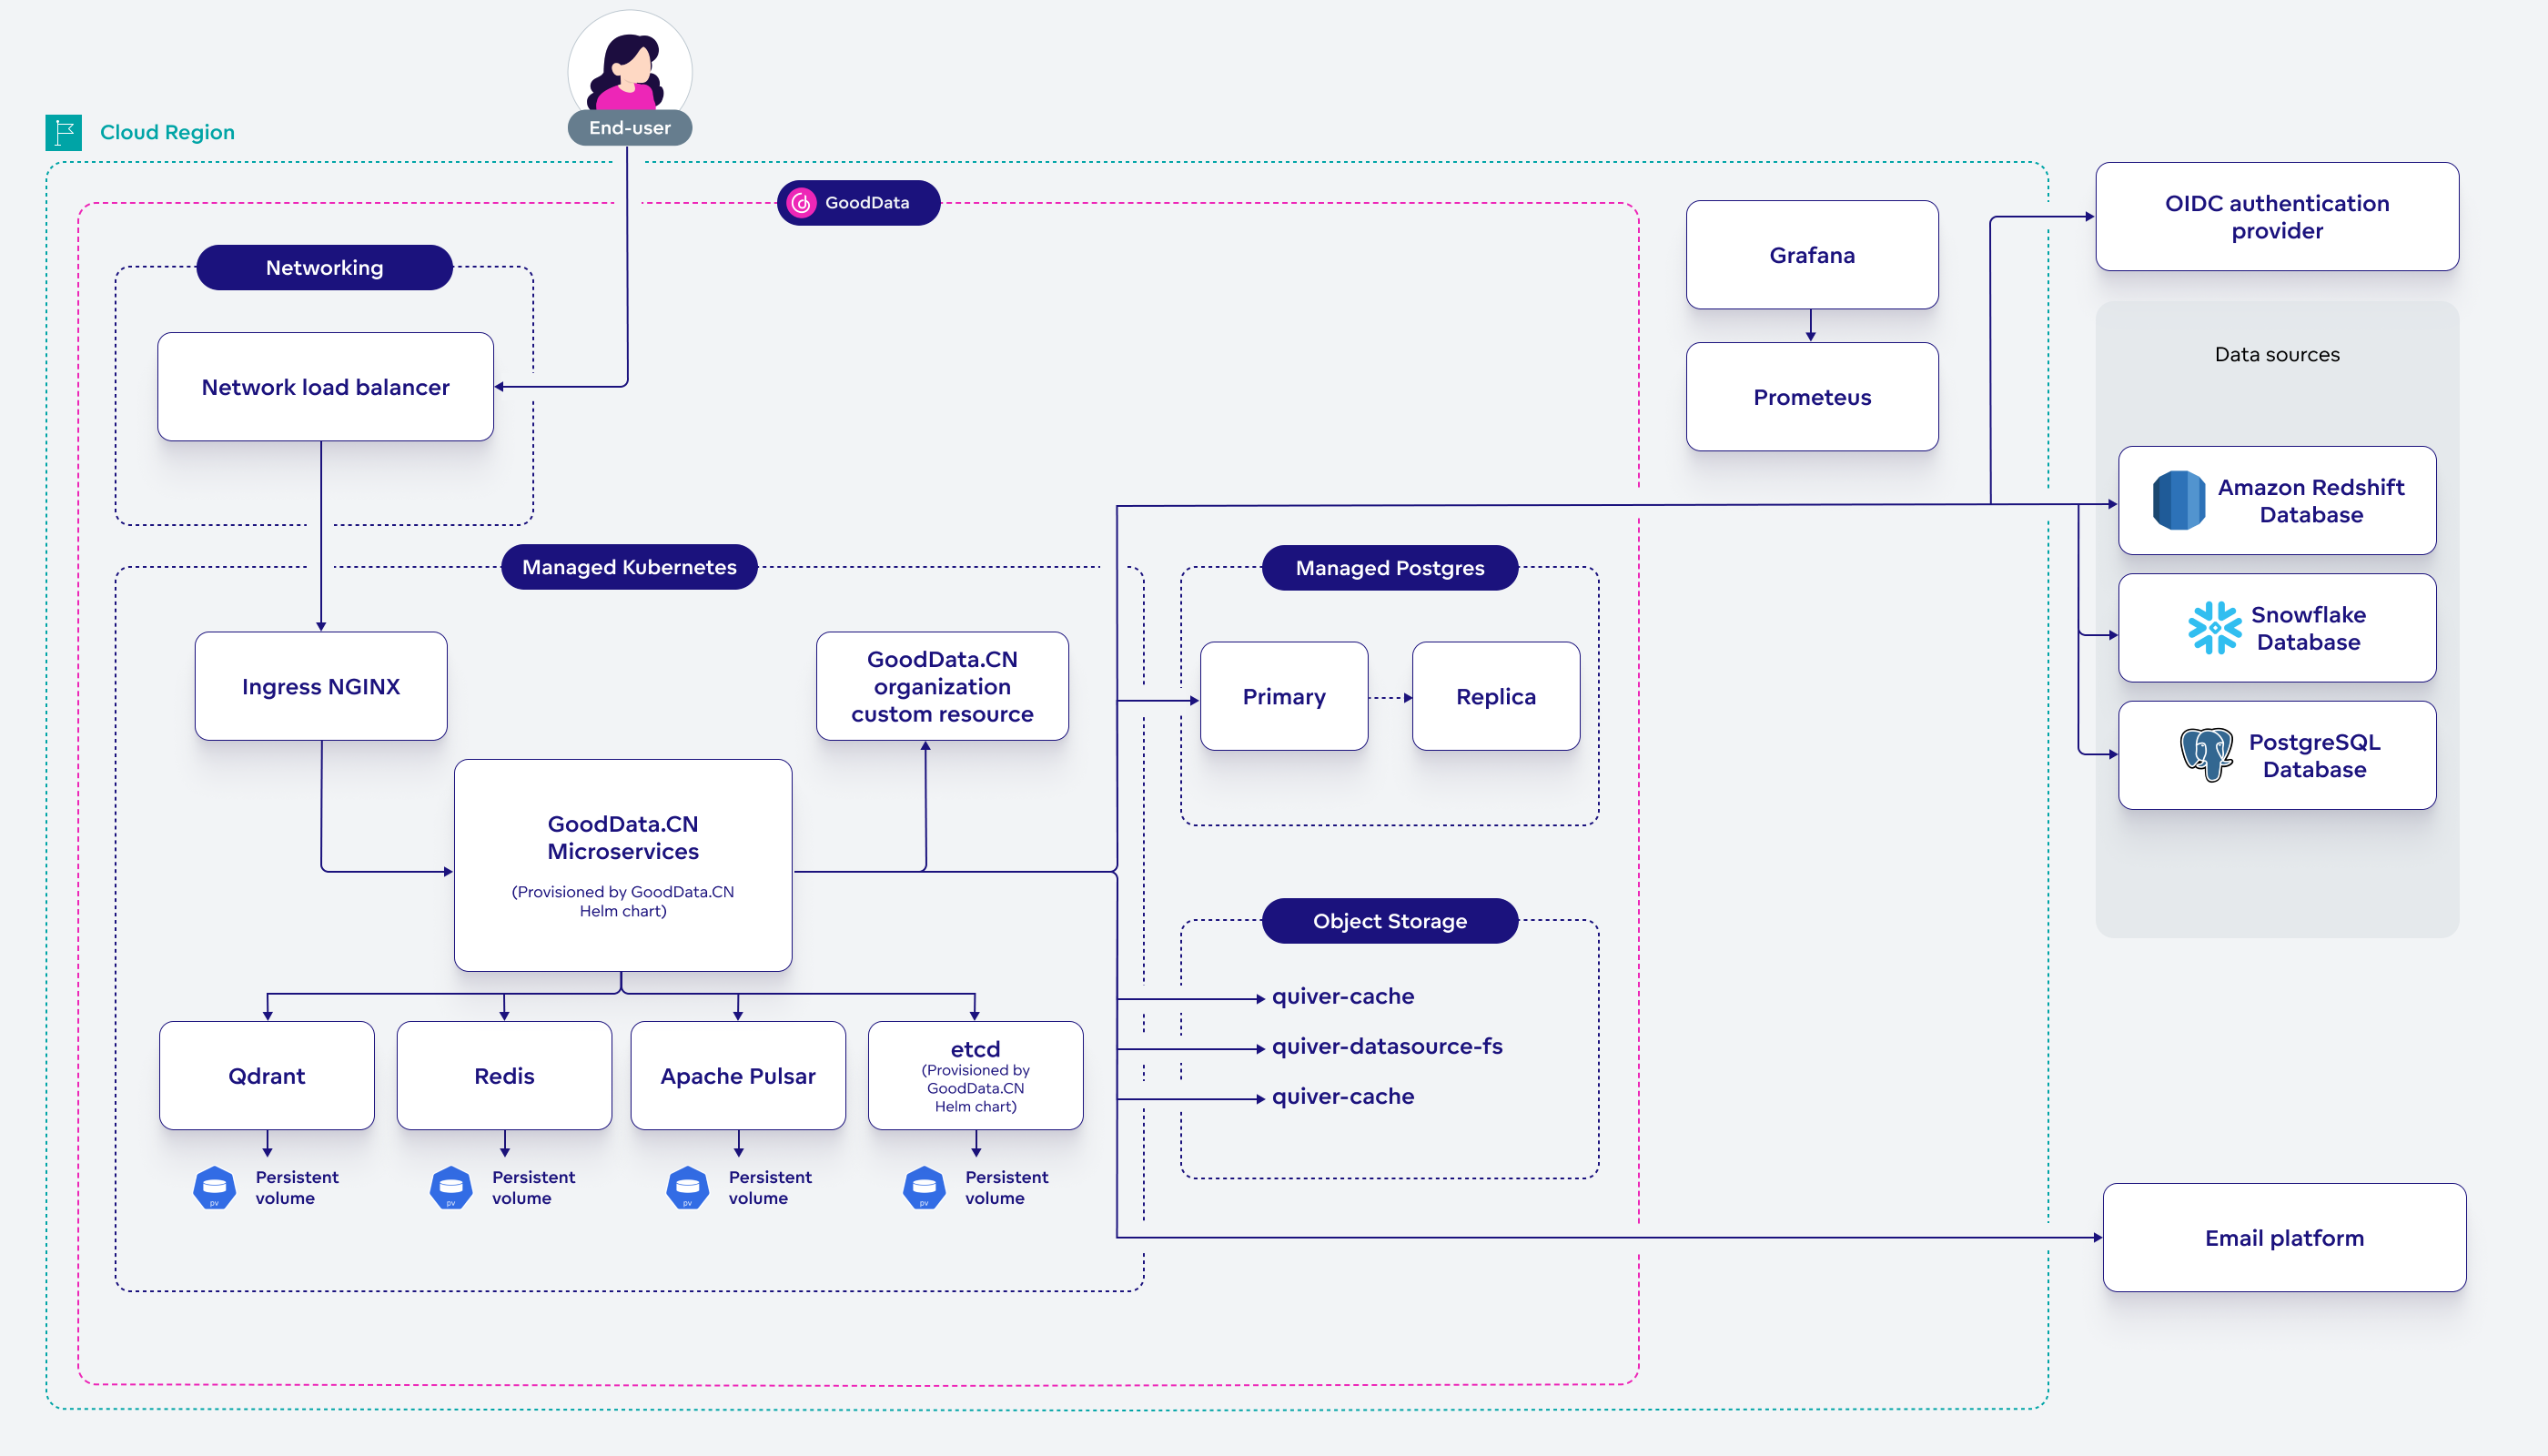
AWS Architecture
The deployment creates a production-like architecture with:
- Multi-AZ VPC with public and private subnets
- EKS cluster with autoscaling node groups
- Application Load Balancer with TLS termination
- RDS PostgreSQL in private subnets with automated backups
- S3 buckets for caching and data storage with encryption
- ECR pull-through cache to reduce Docker Hub dependencies
- Security groups with minimal required access
Cost Considerations
This deployment creates real AWS resources that incur costs:
- EKS cluster: ~$73/month for control plane
- EC2 instances: Variable based on
eks_node_typesand usage - RDS instance: Based on
rds_instance_classselection - Load Balancer: ~$18/month
- S3 storage: Based on data volume
- Data transfer: Based on usage patterns
Remember to destroy resources when not needed to avoid unnecessary charges.
Install
Clone the GoodData.CN Terraform repository:
git clone https://github.com/gooddata/gooddata-cn-terraform.git
cd gooddata-cn-terraform
Check the latest GoodData.CN version for your configuration.
Create a configuration file called
settings.tfvarswith your deployment parameters:aws_profile_name = "my-profile" # AWS profile from ~/.aws/config aws_region = "us-east-2" # AWS region for deployment deployment_name = "gooddata-cn-poc" # Resource prefix (lowercase, <20 chars) dockerhub_username = "myusername" # Docker Hub username dockerhub_access_token = "myaccesstoken" # Docker Hub access token helm_gdcn_version = "3.42.0" # Latest GoodData.CN version gdcn_license_key = "base64-encoded-key==" # Your GoodData.CN license key letsencrypt_email = "admin@example.com" # Email for TLS certificatesNavigate to the AWS deployment directory:
cd awsAuthenticate with AWS:
aws sso login # or aws configure if using access keysInitialize Terraform:
terraform initReview the deployment plan:
terraform plan -var-file=settings.tfvarsThis shows all AWS resources that will be created, including:
- VPC with public/private subnets across two availability zones
- EKS cluster with autoscaling worker nodes
- RDS PostgreSQL instance for GoodData metadata
- S3 buckets for cache, data sources, and exports
- Load balancer and networking components
Deploy the infrastructure:
terraform apply -var-file=settings.tfvarsConfigure kubectl to access the EKS cluster:
aws eks update-kubeconfig \
    --name   "$(terraform output -raw eks_cluster_name)" \
    --region "$(terraform output -raw aws_region)" \
    --profile "$(terraform output -raw aws_profile_name)"
Create your first GoodData.CN organization:
../create-org.shThis script will prompt you for:
- Organization ID: Unique identifier (default:
test) - Organization Name: Display name (default:
Test, Inc.) - Organization Hostname: From terraform output
gdcn_org_hostname - Admin Username: Admin user for the organization (default:
admin) - Admin Password: Password for the admin user
- Organization ID: Unique identifier (default:
Access your GoodData.CN instance:
Open the URL shown in the terraform output
gdcn_org_hostnameand log in with the credentials you provided during organization setup.You can now move onto Getting Started and start testing your AWS-hosted instance of GoodData.CN.
Daily Operations
| Action | Command |
|---|---|
| Check deployment status | terraform show |
| View outputs | terraform output |
| Access cluster | kubectl get pods -n gooddata-cn |
| Scale cluster | Modify eks_max_nodes in settings.tfvars and run terraform apply |
| View logs | kubectl logs -n gooddata-cn deployment/gooddata-cn-app |
And to manage your organization:
| Action | Command |
|---|---|
| List organizations | kubectl get org -n gooddata-cn |
| Create organization | ../create-org.sh |
| Delete organization | kubectl delete org <org-id> -n gooddata-cn |
Upgrade
To upgrade your AWS deployment to a newer GoodData.CN version:
Check for any updates to the Terraform repository:
git pull origin mainReview the release notes for the latest version and any breaking changes.
Update
helm_gdcn_versionin yoursettings.tfvarsfile:helm_gdcn_version = "3.42.0" # New versionOptionally, preview the plan before applying:
terraform plan -var-file=settings.tfvarsApply the upgrade:
terraform apply -var-file=settings.tfvars
Configuration Options
The deployment supports various customization options through variables:
Infrastructure Sizing
# EKS Configuration
eks_version     = "1.33"                          # Kubernetes version
eks_node_types  = ["m6i.large", "m6i.xlarge"]     # Instance types for workers
eks_max_nodes   = 5                               # Maximum worker nodes

# RDS Configuration
rds_instance_class = "db.t4g.medium"              # Database instance size

# Additional AWS Tags
additional_tags = {
  Environment = "poc"
  Team        = "analytics"
}
DNS and Networking
# Custom DNS provider (default: sslip.io)
wildcard_dns_provider = "nip.io"

# Custom AWS region
aws_region = "eu-west-1"
Teardown
To completely remove all AWS resources and avoid ongoing costs:
Delete all GoodData.CN organizations first:
kubectl delete org --all -n gooddata-cnDestroy all Terraform-managed resources:
terraform destroy -var-file=settings.tfvars
Troubleshooting
Terraform Errors
State Lock Issues:
# If terraform state is locked
terraform force-unlock <lock-id>
Resource Conflicts:
- Ensure deployment names are unique within your AWS account
- Check AWS service limits for your region
- Verify IAM permissions for all required services
Kubernetes Issues
Pod Failures:
# Check pod status
kubectl get pods -n gooddata-cn

# View pod logs
kubectl logs -n gooddata-cn <pod-name>

# Describe pod for events
kubectl describe pod -n gooddata-cn <pod-name>
Image Pull Errors:
- Verify Docker Hub credentials in
settings.tfvars - Check ECR pull-through cache configuration
AWS Resource Issues
EKS Access Denied:
- Ensure AWS CLI is configured correctly
- Verify the AWS profile has necessary EKS permissions
- Update kubeconfig as shown in step 9 of installation